Self-host multilingual Ghost blog with subdirectory routing
To support two languages, you’ll need to install 2 Ghost sites on the same server, setting up separate instances for each language.
- Default English -
https://domain.com - Vietnamese -
https://domain.com/vi/ - German -
https://domain.com/de/
Option 1: Hosting with SynapsMedia (Best & Simplest)
If you don’t want to deal with complex server management, command-line interfaces, reverse proxies, or writing configuration files, using SynapsMedia is the best option.
SynapsMedia is a professional, managed Ghost hosting service that officially supports subdirectory multi-language routing natively.
Why choose SynapsMedia?
- Fully Managed: They handle server setup, maintenance, security, and updates.
- Subdirectory Support: You can easily run your primary site at
https://domain.comand secondary language sites as subdirectories likehttps://domain.com/vi/orhttps://domain.com/de/. - No Code Required: No need to configure Nginx, write YAML files, or manage SSH keys.
- Expert Support: Outstanding technical support specialized in Ghost CMS.
Key Benefits of SynapsMedia Subdirectory Setup
- Shared Newsletter Quota: Sites under the same domain share their email limits. If you have 3 sites under the same domain, and each has 2,000 monthly newsletter credits, they share a combined pool of 6,000. Credits are automatically deducted in this order: the sending site, then the root site, then other connected sites under the same domain.
- Shared Custom Sending Domain: Subdirectory installs automatically inherit the custom sending domain from the root site.
- Lower Cost: Subdirectory installs benefit from a 10% multi-site discount.
- Unlimited Subdirectory Sites: Create as many subdirectory sites as you need (e.g.
/vi,/de,/fr,/docs,/blog).
How to Configure Subdirectory Installs on SynapsMedia
To set up subdirectory multi-language routing on SynapsMedia, follow these simple steps:
- Create Publications: Ensure you have at least 2 Ghost publications running under your SynapsMedia account (one will be the primary site, the other will be the secondary language site).
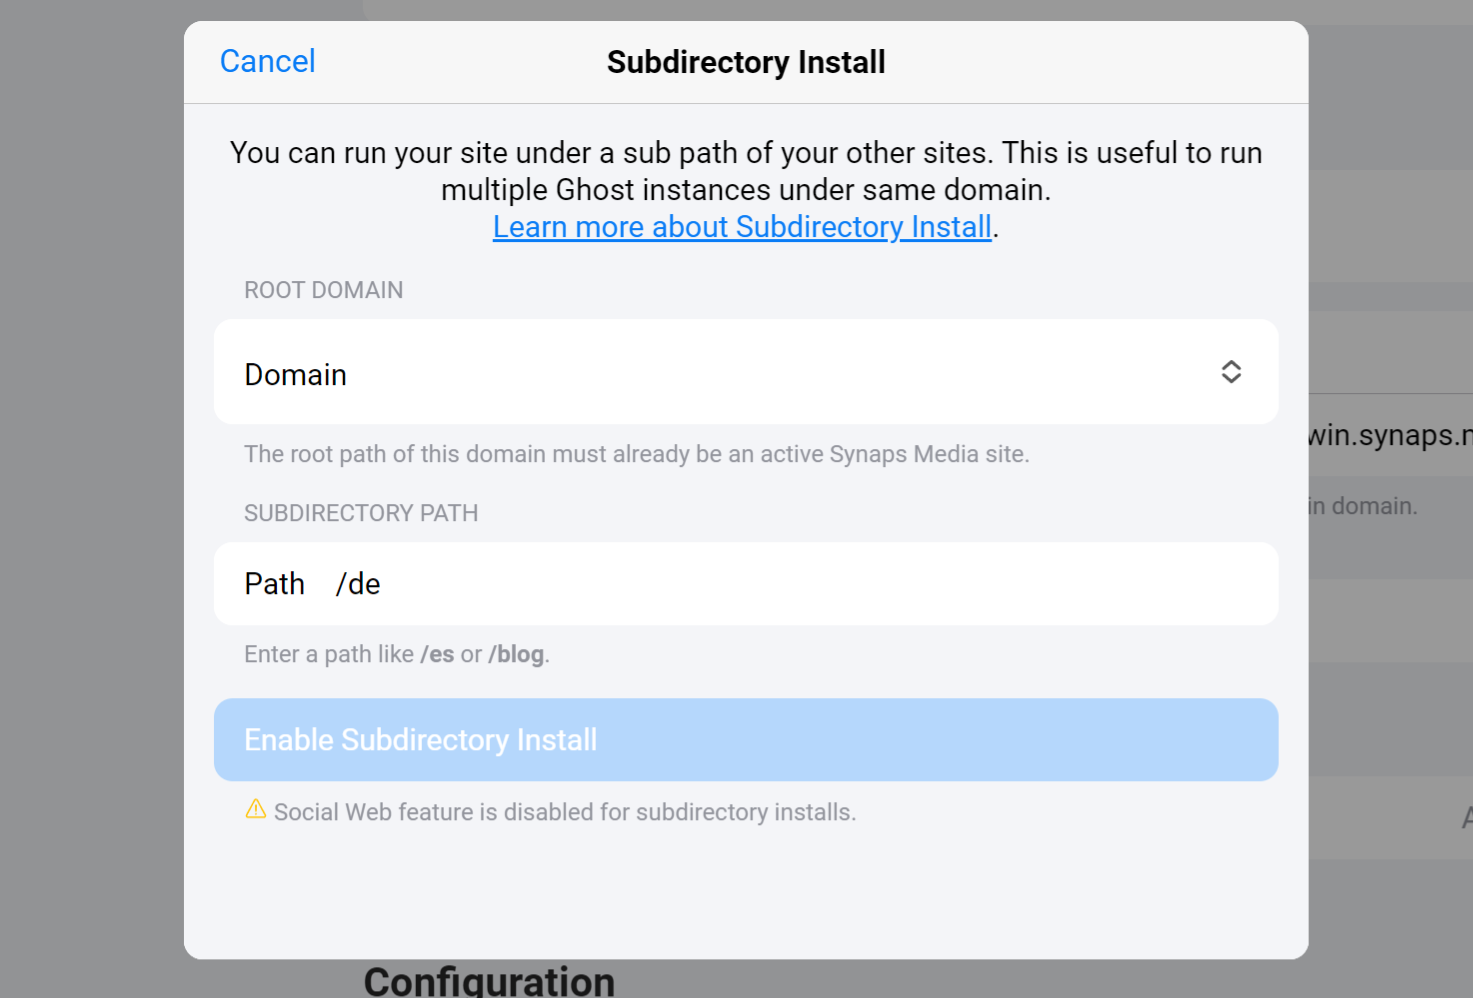
- Access Settings: In the SynapsMedia Panel, go to the settings page of the Ghost site you want to run under a subdirectory (the secondary language site).
- Enable Subdirectory Install: Scroll down to the Domains section and click the Enable subdirectory install button.
- Configure Routing:
- In the Domain dropdown field, select the main domain of your active primary Ghost site.
- In the Subdirectory path field, enter the desired path (e.g.,
viorde).
- Save and Restart: Click Enable Subdirectory Install. SynapsMedia will automatically reconfigure and restart both the primary and secondary publications within a minute.
Rules and Restrictions to Keep in Mind
- Separate Ghost Admins: The admin panels for each site remain separate. You can access the subdirectory’s admin panel at
https://domain.com/{subdir}/ghost/. - Email Deliverability: All publications under the same domain will send membership and newsletter emails using the same sending domain config from the root site.
- Sitemaps & Robots.txt: Sitemaps are separate; you will need to submit the subdirectory sitemap to Google Search Console manually. For
robots.txt, you must manually merge rules on your root publication since they do not merge automatically. - Social Web: The Social Web (ActivityPub federation) feature is disabled on subdirectory installations.
Option 2: Self-host on Railway (Easiest & Automatic)
Setting up a multi-language Ghost blog on Railway is very easy with our official 1-Click Setup. It installs the traffic router, two Ghost sites, and database all at once.
What you need:
- A Railway account.
- A custom domain (e.g.,
your-domain.com).
Step 1: Launch the 1-Click Setup
- Click the button below to start:

- Railway will automatically set up:
- Traffic Router (Nginx Proxy)
- Primary Blog (e.g., English)
- Secondary Blog (e.g., Vietnamese)
- Database (MySQL)
Step 2: Link the Blogs
After deployment, copy and paste the internal links so the traffic router knows where to send visitors.
Copy the Private Links:
- Go to the Settings tab of each Blog service on Railway.
- Scroll to the Networking section and copy the private link ending in
.railway.internal(e.g.,http://ghost.railway.internal:2368andhttp://ghost-vi.railway.internal:2368).
Configure the Traffic Router: Select the Nginx Proxy service, go to the Variables tab, and set:
SERVER_NAME: Your domain (e.g.,your-domain.com).GHOST_ROOT_URL: The private link of your Primary Blog.GHOST_INSTANCES: The path and private link of your Secondary Blog (e.g.,/vi:http://ghost-vi.railway.internal:2368).
Set the Public Addresses:
- On the Primary Blog variables: Set
urltohttps://your-domain.com. - On the Secondary Blog variables: Set
urltohttps://your-domain.com/vi/.
- On the Primary Blog variables: Set
Step 3: Link Your Domain
- Open the Nginx Proxy service settings.
- Under Networking, click + Add Domain and enter your domain (e.g.,
your-domain.com). - Connect the domain to the proxy on service port
8080. - Point your DNS records to Railway at your domain registrar.
Once active:
https://your-domain.comloads the English blog.https://your-domain.com/vi/loads the Vietnamese blog.
Option 3: Hosting Ghost Multilingual on DigitalOcean
Ready to go multilingual? This guide walks you through every single step to deploy a complete Ghost setup on DigitalOcean. Prerequisites
- DigitalOcean account (if have not one, register new DigitalOcean account here)
- Termius Software on your Desktop (Free download it here)
1. Generate SSH Key for Server Access
If you don’t already have an SSH key, follow these simple steps:
- Open Termius (which you downloaded earlier).
- Navigate to Settings > Keychain > Generate Key.
- Name your key label and select RSA as the key type.
- Click on Generate and Save.
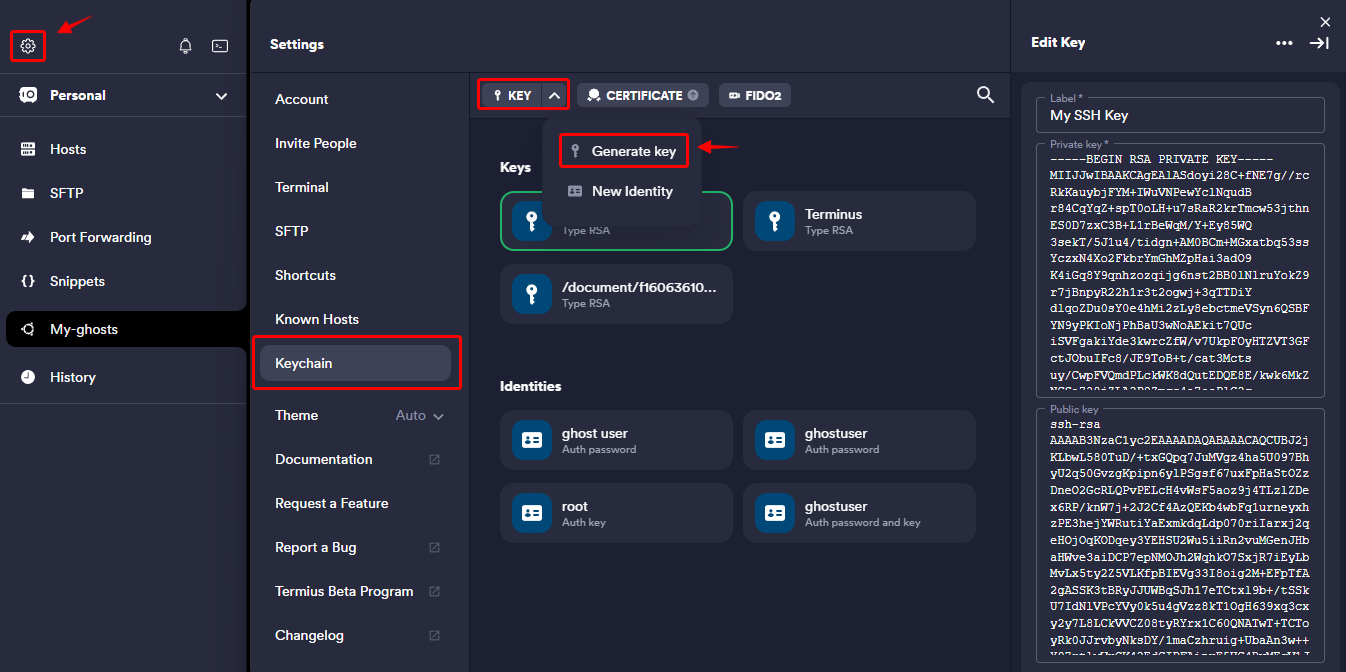
Make sure to copy and securely store both the Private Key and Public Key. These keys will be essential for secure access to your server.
ssh-rsa AAAAB3NzaC1yc2EAAAADAQABAAACAQCUBJ2jKLbwL580TuD/+txGQpq7JuMVgz4ha5U097BhyU2q50GvzgKpipxxxx...Note
Public Key will be used for create new server DigitalOcean, so keep it for next step.
2. One-click install ghost
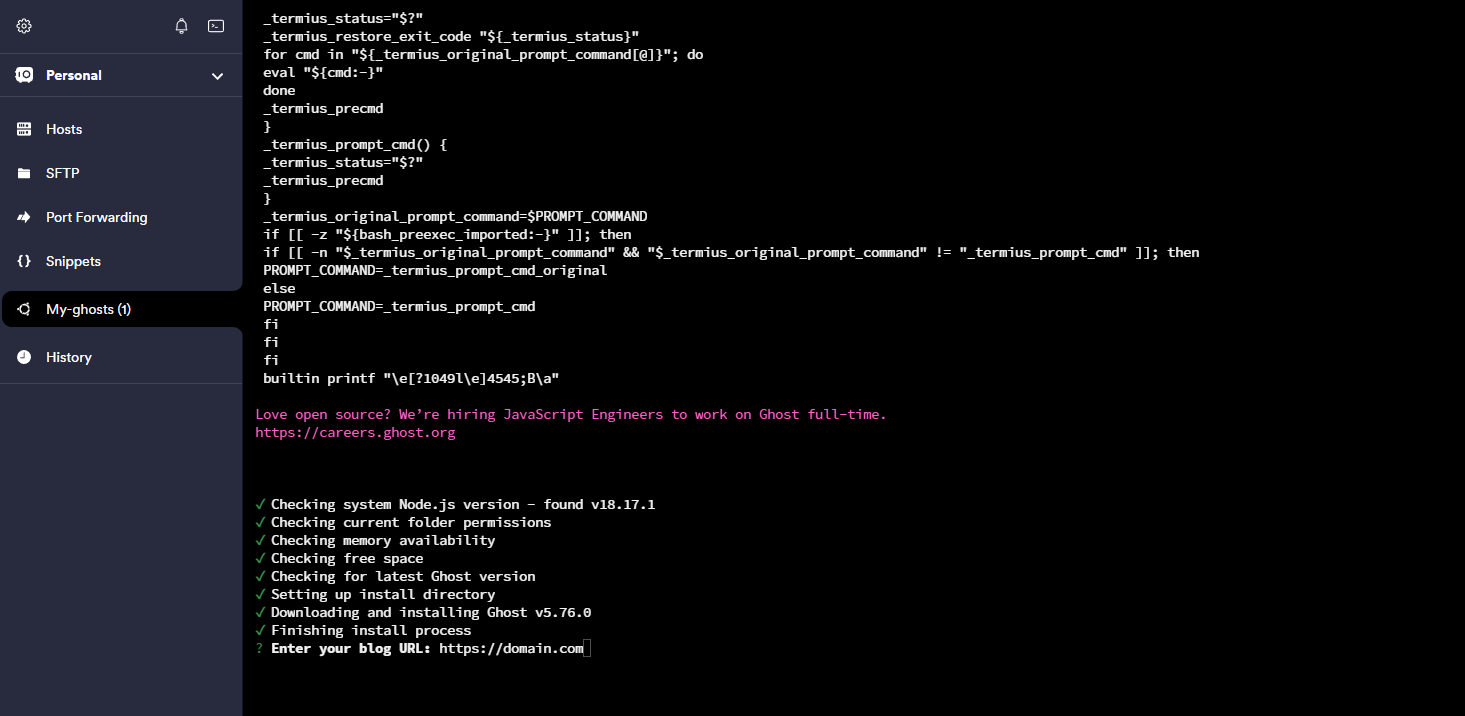
Refer to the official Ghost documentation for a step-by-step guide on installing Ghost.
However, make sure to create a new server with a minimum of 2GB RAM as per the requirements (2 ghosts).
One-click install will auto install all server requirements for ghost.
Watch the video above as it guides you through the one-click installation of Ghost on DigitalOcean, providing easy-to-follow instructions.
Note
In Termius, you can use Ctrl + U to delete all text on the current line in the terminal. If there are incorrect texts during the process, this shortcut will help you clear the line quickly.
3. Install the second ghost
Refer to Aspire Themes tutorials for a step-by-step guide on installing sencond Ghost on DigitalOcean. Thanks Aspire Themes.
However, there are some differences.
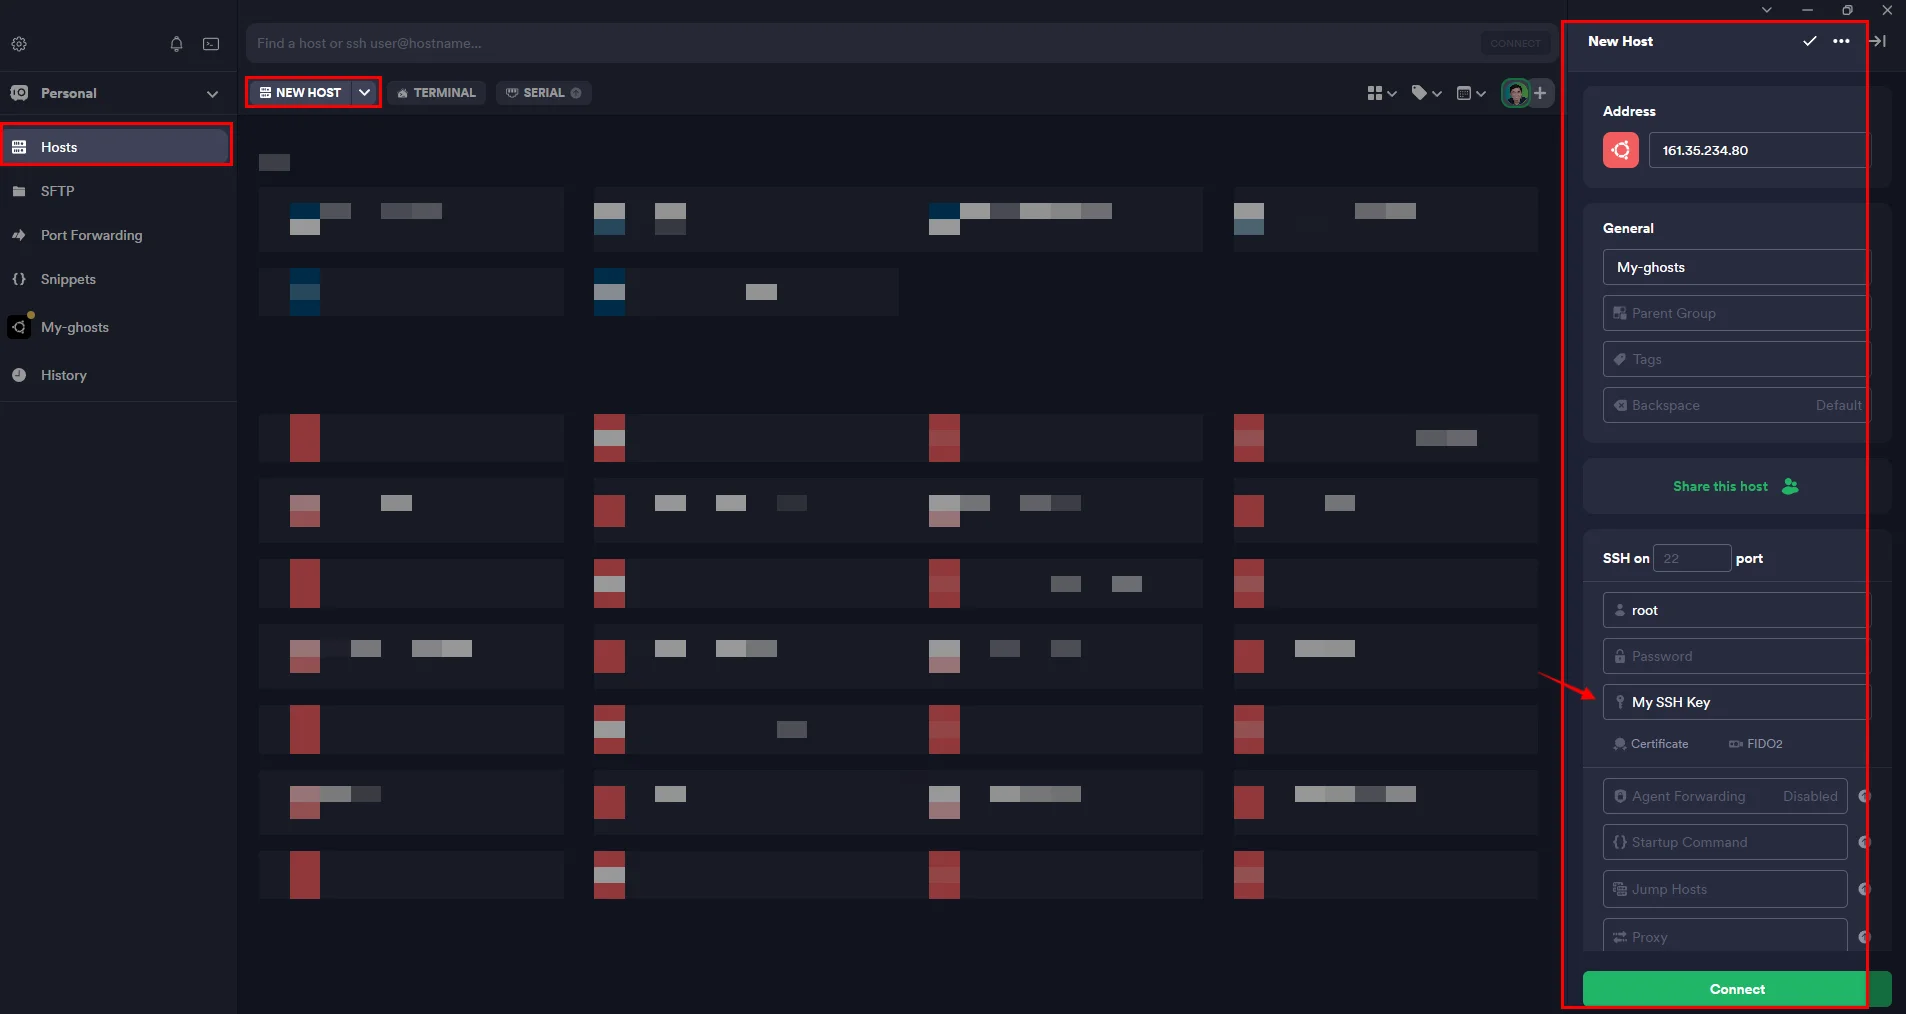
Use Termius to access the DigitalOcean server.
You need the current MySQL host, username, and password.
Terminal window cd /var/www/ghost/cat config.production.jsonTake notes of them. You will use them later in steps 3 and 5.
Create a website directory
ghost-deTerminal window cd /var/www/sudo mkdir ghost-desudo chown ghost-mgr:ghost-mgr ghost-de/Login to MySQL and create a new database
Terminal window sudo mysql -u root -pCREATE DATABASE ghost_de;GRANT ALL PRIVILEGES ON ghost_de.* to 'ghost'@'localhost' IDENTIFIED BY '7d150600c49e7c5860be7ce03d4f8df67259176738d926ec';FLUSH PRIVILEGES;exitNote down:
MYSQL password:
7d150600c49e7c5860be7ce03d4f8df67259176738d926ecDatabase name
ghost_deYou will need it for for step 5.
Switch to the
ghost-mgruserTerminal window sudo -i -u ghost-mgrInstall Ghost and follow the installation steps
Terminal window cd /var/www/ghost-de/ghost installAt
Blog URLquestion, you need to fillhttps://yourdomain.com/deCheck more ghost install with CLI
4. Config Nginx
Edit
domain.com-ssl.confTerminal window cd /etc/nginx/sites-availableslsnano domain.com-ssl.confNote
Replace your real domain
Add proxy block as below
domain.com-ssl.conf ...location / {proxy_set_header X-Forwarded-For $proxy_add_x_forwarded_for;proxy_set_header X-Forwarded-Proto $scheme;proxy_set_header X-Real-IP $remote_addr;proxy_set_header Host $http_host;proxy_pass http://127.0.0.1:2368;}location /de/ {proxy_set_header X-Forwarded-For $proxy_add_x_forwarded_for;proxy_set_header X-Forwarded-Proto $scheme;proxy_set_header X-Real-IP $remote_addr;proxy_set_header Host $http_host;proxy_pass http://127.0.0.1:2369;}...Now you 2 ghosts and can access to ghost admin at:
English site (primary language) —
https://domain.com/ghost/German site (secondary language) —
https://domain.com/de/ghost/
Check the Ghost Config documentation for instructions on setting up SMTP and other configurations for each Ghost instance.
Option 4: Hire Fiverr freelancer for help
Don’t let technical difficulties hold you back — tap into Fiverr’s network of skilled Ghost freelancers and get your Ghost project up and running in no time!
With a wide range of expertise, they can guide you through the intricacies of Ghost, ensuring a smooth and efficient deployment process.